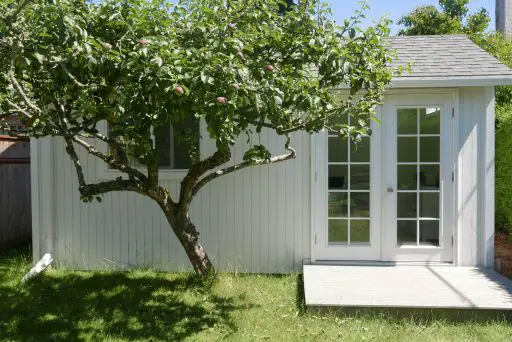
A shed is an ideal place to create a tiny home. The advantage of a shed is that it can create a more permanent home you can move around. On the other hand, you still have the convenience of being able to use the shed when you don’t need the additional space.
Tiny homes are usually inexpensive and small, usually one or two rooms. You can build them from salvaged materials and have a simple construction.
There are several benefits to creating a tiny home.
Benefits
A shed is an ideal place to create a tiny home because it is portable and easy to move around. It is also very inexpensive to buy or build because it does not require any specialized tools or expertise in construction techniques or carpentry skills.
Also, because of its low cost, you can save money by building your own tiny house from scratch instead of renting or buying one from a manufacturer.
Another benefit is that it provides you with an enclosed space where you can keep things like your vehicle, tools, food, and clothing. This is useful because you can protect your belongings from weather damage.
Cost
The cost of a shed is relatively low, ranging from about $2,500 to $30,000. This cost includes the materials and labor required for building the shed. The most expensive part of the shed is the wood because it can cost anywhere from $20 to $175 per square foot.
If you want to use recycled materials and can find them at local thrift stores or yard sales, you can save money on your shed’s materials.
Construction
The Frame
The first step in building a shed is to build the frame. The frame should be as sturdy as possible so that it will not collapse or move when you add the materials to the shed.
You will need a couple of basic tools to help build the frame, including a circular saw, drill, and tape measure.
You will also need some basic hand tools, like a hammer and screwdriver, for some tasks that are required to complete this project. The shed should be about 4 feet wide by 8 feet long.
Materials
The next step is to cut all the materials needed for your shed from 2x4s and 2x6s using a circular saw or miter saw.
When cutting wood with a circular saw, make sure that you measure the cuts with a tape measure and keep your fingers well away from any moving parts to avoid getting cut or splinters from being thrown by the blade.
When cutting wood with a miter saw, you can use either side of the blade to cut both sides of the board at once by adjusting it at an angle between 90 degrees and 45 degrees. Make sure that you measure the cuts with a tape measure.
It is best to make all the cuts at the same height so that you do not have to worry about fitting the pieces together.
It is also important to use both sides of the blade when cutting each piece because they will fit together better and there will be less chance of splinters flying from being thrown by the blade.
Assembly
After you cut all the pieces, it is time to assemble them using screws and nails. It is important to use high-quality screws and nails for this project. Therefore, they will not damage your wood or cause any additional damage during assembly.
The shed should be about 6 feet wide by 8 feet long, but keep in mind that you may need to make adjustments depending on your personal preferences and needs.
Paint or Stain
After you assemble all the pieces, it is time to paint or stain them so that they match your tastes and preferences.
It is best to paint or stain your shed before installing it. This will allow you to make sure that everything fits together correctly before moving on to add any final touches like window treatments or shingles.
Add Siding
Once the paint or stain is dry, it is time to add siding to your shed. You can do this by cutting the pieces of wood that are necessary for the siding to size and then nailing them together using a hammer and nail gun.
The siding should be only 1/4 inch thick, but you may need to adjust this depending on your personal preferences and needs.
Install Windows and Doors
Once you have installed the siding, it is time to install windows and doors.
You can do this by first installing the door frames with screws, then attaching the door panels using hinges and screws or nails, and any additional hardware you may need for each window you install.
You will also need to install a roof for your shed using shingles if you choose to do so.
Add Insulation And Finish Touches
Once you have installed all the windows and doors, it is time to add insulation around all the openings. You need to do this to prevent heat loss from occurring during winter months when temperatures drop below freezing point outside, or during summer months when temperatures rise above 90 degrees Fahrenheit (32 degrees Celsius).
It is also important to add a finishing touch to your shed so that it looks as nice as possible before moving on to other steps.
Do this by adding siding around the perimeter of the shed and installing a door on one side of the shed so that you can easily access your belongings inside of it.
Build Your Tiny House from Scratch
Now that you have learned how to turn a shed into a tiny home, you should be able to decide if this is something that you would like to do for yourself.
If you decide it is something that you would like to do, then it is time to build your own tiny house from scratch.
